


 Share on ChatGPT
 Share on Grok

The U.S. added 43.2 GW of solar in 2025 (SEIA), and home systems are transforming rooftops across America into mini power plants. If you're dreaming of energy independence or tired of rising electricity bills, understanding the installation process is your first step. The federal homeowner tax credit ended for systems completed after December 31, 2025.
Short Answer: How Long Does Solar Installation Take, and What Does It Cost?
The work on your roof usually takes 1–3 days. The full process, from site assessment to your utility's permission to operate (PTO), typically takes 1–3 months, or 3–5 months where permitting is slow. A home solar PV system costs about 2.60–4.00 per watt before incentives, roughly 18,000–28,000 for 7 kW. Even if you do part of the work yourself, leave the electrical connection to a licensed electrician.
The process in 5 steps: (1) site assessment and system design, (2) permits and paperwork, (3) equipment procurement, (4) installation, (5) inspection and grid connection.
What Changed in 2026
- The homeowner tax credit ended. Section 25D does not cover systems completed after December 31, 2025 (IRS).
- Leases, PPAs, and prepaid plans can still carry a federal credit through the provider, within deadlines (SEIA).
- Tariffs are rising. Duties on Chinese modules stayed above 200% in Q2 2026 (A1 Solar Index), and new Section 232 tariffs start December 4, 2026 (Solar Power World).
- The market is shifting. Many states are replacing net metering (NC Clean Energy Technology Center), and SEIA forecasts residential installations to fall 23% in 2026.
Key takeaways
- Professional installation is strongly recommended for safety, warranty protection, and optimal system performance
- The complete process typically takes 1–3 months from initial consultation to powering your home with solar energy, and 3–5 months where permitting or utility approval is slow
- Proper system sizing based on your energy consumption and roof characteristics determines long-term success
- Multiple financing options exist beyond cash purchases, including loans, leases, and power purchase agreements
- The federal homeowner tax credit (25D) has ended for systems completed after December 31, 2025, so incentives now depend mostly on your state, your utility, and how you finance the system
What You Need to Know before Installing Solar Panels
Before any solar panel touches your roof, you need to understand whether your home is ready for this renewable energy transformation. The preparation phase determines everything from system size to final costs.
Assessing Your Home's Solar Potential
Your roof's characteristics play a crucial role in solar system performance. South-facing roofs with minimal shading deliver the best results, but east and west-facing installations can still provide excellent returns.
Key factors that impact solar potential:
A typical residential solar installation adds roughly 2–4 pounds per square foot to your roof's weight, comparable to a second layer of shingles. Installers confirm that your roof can carry this load during the site assessment
- Roof age and condition: Panels last 25+ years, so your roof should too. If your roof needs replacing soon, do it before installation, because removing and reinstalling panels later adds cost (see our guide to solar panel removal costs)
- Available space: Most homes need 15–20 panels for adequate coverage with typical 400-450 W panels
- Shading patterns: Trees, chimneys, or neighboring buildings reduce efficiency
- Roof pitch: Most pitched roofs work well, and the ideal tilt is close to your latitude
- Structural integrity: Your roof must support additional weight
Professional installers use satellite imagery and specialized software to calculate your roof's solar potential. These tools consider seasonal sun patterns, local weather data, and shading obstacles to provide accurate production estimates.
Understanding Your Energy Consumption
Knowing your household's electricity usage helps determine the right system size and expected savings. The average U.S. home uses about 10,400 kilowatt-hours (kWh) a year, or roughly 865 kWh a month (EIA, 2024 data), but your specific usage depends on home size, appliances, and lifestyle habits.
Steps to analyze your energy consumption:
- Gather 12 months of electric bills to identify usage patterns
- Calculate your average monthly kWh consumption
- Identify peak usage months (typically summer for cooling)
- Consider future changes like electric vehicles or pool installations
Typical annual use and system size by household. These are estimates, and actual numbers vary with climate, home size, and appliances.
Choosing the Right Solar System Size
System sizing balances your energy needs with budget constraints and roof space limitations. Most homeowners aim to offset 80–100% of their electricity consumption, though over-sizing can provide benefits in some situations.
A quick way to estimate the size you need: divide your annual kWh by 365, by the peak sun hours in your area, and by about 0.8 to account for system losses. For a home using 10,400 kWh a year in a location with 4.5 peak sun hours, that works out to roughly 7.9 kW, or about 18–20 panels of 400–440 W each. NREL's free PVWatts calculator gives you the sun hours and expected production for your address. For comparison, the median U.S. home system installed in 2024 was 7.2 kW (Berkeley Lab).
Professional installers use sophisticated modeling software to set optimal system parameters that consider all these factors. They'll provide production estimates, financial projections, and multiple system size options to help you make an informed decision.
Solar Panel Installation: Professional vs. DIY Approach

The internet overflows with DIY solar installation guides, but the reality of installing a grid-tied solar system involves significant complexity, safety risks, and regulatory requirements that most homeowners underestimate.
Why Professional Installation Makes Sense
Professional installation offers advantages that extend far beyond convenience. Licensed installers bring expertise, proper equipment, and industry relationships that DIY approaches simply cannot match.
Benefits of professional installation:
- Safety expertise: Working on roofs with electrical systems requires specialized training
- Warranty protection: Some equipment and workmanship warranties depend on professional installation, so read the terms before you buy
- Permitting knowledge: Installers handle complex local permit requirements
- Code compliance: Electrical and building codes vary by location
- Insurance coverage: Professional work includes liability protection
Given these advantages, it's no surprise that professional installation is the norm for residential solar in the United States. Major solar companies dominate the residential market, and DIY installations remain relatively uncommon due to permitting complexity, equipment warranties, and safety requirements.
Professional installers also provide system monitoring, maintenance support, and performance guarantees. When issues arise – and they occasionally do – having professional support can save thousands in troubleshooting and repair costs.
When selecting a solar installer:
- Prioritize companies with at least five years of experience and strong local references.
- Check for proper licensing (varies by state), insurance coverage, and certifications from organizations like the North American Board of Certified Energy Practitioners (NABCEP).
- Request multiple quotes, typically three to five, to compare pricing, equipment options, and warranty terms.
- Be wary of high-pressure sales tactics or prices that seem too good to be true.
The best installers will conduct thorough site assessments, provide detailed proposals, and answer all your questions patiently before you commit.
The Reality of DIY Solar Installation
DIY solar installation appeals to handy homeowners looking to save money and do the work yourself, but the challenges often outweigh the benefits. Understanding these realities helps you make an informed decision about your approach.
DIY installation challenges:
- Electrical work complexity: DC and AC wiring requires electrical expertise
- Roof work dangers: Falls are the leading cause of death in construction. The Bureau of Labor Statistics counted 370 fatal falls, slips, and trips among construction and extraction workers in 2024
- Permit complications: Many jurisdictions scrutinize DIY applications more carefully
- Equipment sourcing: Wholesale pricing often unavailable to individuals
Time and savings figures are typical estimates, not measured averages.
Many DIY enthusiasts discover that permit fees, tool purchases, and time investments erode much of the anticipated savings.
How to Install Solar Panels Yourself: A Step-by-Step Overview
If you plan to do part of the work yourself, this is how a typical roof-mounted, grid-tied installation goes. Treat it as an overview, not a replacement for the manufacturer's installation manual and your local electrical code. In most places the permit, the final inspection, and the utility approval are required whether you or a contractor does the work, so call your local permit office and your utility before you buy anything. If you prefer a packaged approach, a DIY solar kit from our solar systems catalog bundles matched components.
Before you start
- Confirm with your permit office and utility that owner-installed systems are allowed and what paperwork they require
- Check your roof's age, condition, and structure, and your main electrical panel's capacity
- Size the system (see the formula above) and check your insurer's and equipment manufacturer's warranty terms
- Line up a licensed electrician for the connection to your main panel
Tools and materials
- Tools: drill/driver, socket set, level, tape measure, chalk line, stud finder, wire strippers, MC4 crimping tool, multimeter, torque wrench, ladder, safety harness, gloves, eye protection, hard hat
- Materials: solar panels, mounting rails, roof attachments with flashing, clamps, inverter (string, microinverters, or optimizers), PV wire and connectors, junction or combiner box, conduit, grounding hardware, disconnects and breakers, labels, roof sealant
Steps
- Plan the layout. Map out where the array goes, keeping panels clear of roof edges and ridges as your local fire code requires, and away from shade. Mark the rafters, because the mounts must go into solid framing.
- Install the roof attachments. Fasten the mounts into the rafters and seal and flash every roof penetration. Poor flashing is the most common cause of leaks after a solar installation. Roof type matters, so see our guides for a standard roof, a flat roof, a tile roof, and a metal roof.
- Attach the rails. Mount the rails to the attachments, check that they are level and parallel, and tighten to the manufacturer's torque specification.
- Mount the panels. Panels produce voltage whenever light hits them, so handle them with care and cover them if you pause work. Use two people to lift, clamp each panel to the rails, and ground the array as the manual specifies.
- Wire the array. In a series connection, voltages add up while current stays the same. In a parallel connection, current adds up while voltage stays the same. Your inverter's input voltage and current limits decide which layout is allowed. Microinverter systems skip this decision, because each panel converts power on its own. For more on how the pieces connect, see how solar panels are connected to your house.
- Install the inverter, disconnects, and shutdown devices. Mount the inverter, add the required disconnects, label everything, and install rapid-shutdown equipment where your local code requires it. Rooftop systems are generally covered by Article 690 of the National Electrical Code (NEC).
- Connect to your main panel. This is the step to hand to a licensed electrician. The rating of your panel's busbar limits how large a solar breaker it can accept, and a mistake here can cause fires or injure utility workers.
- Pass inspection and get approval. Schedule the electrical inspection, then wait for your utility's permission to operate. Do not switch the system on before you have it (more on permission to operate (PTO) below).
- Test and monitor. Check voltages and production against your design, and set up monitoring so you spot problems early.
Common DIY mistakes
- Working on the roof without fall protection
- Choosing an inverter that doesn't match the array's voltage or current
- Under-sealing roof penetrations
- Mixing panels of different types or wattages in one string
- Ignoring shade from chimneys, vents, or trees
- Energizing the system before inspection and utility approval
- Skipping permits, which can void warranties and create insurance problems when you sell the house
Where DIY should stop: the connection to your main electrical panel, the interconnection paperwork with your utility, and any step your local code says a licensed electrician must perform.
The Complete Solar Installation Process
Understanding each step of professional installation helps you prepare for the journey from initial consultation to flipping the switch on your new solar system.
Step 1: Site Assessment and System Design
The installation process begins with a comprehensive site assessment. Professional installers evaluate your roof, electrical system, and energy needs to design an optimal solar solution.
Site assessment components:
- Roof measurements and structural evaluation
- Shading analysis using specialized tools
- Electrical panel capacity assessment
- Energy consumption analysis and system sizing
The design phase typically takes 1–2 weeks and results in detailed proposals showing system specifications, production estimates, financial projections, and instructions on how to set up the installation timeline.
Step 2: Permits and Paperwork
Solar installations require various permits and approvals that vary by location. Professional installers handle this bureaucratic maze, but understanding the process helps you track progress.
Required documentation typically includes:
- Building permits from local authorities
- Electrical permits for system connections
- Utility interconnection applications
- HOA approvals where applicable
The permitting process ranges from same-day approval in places that use automated platforms to several weeks or longer in backlogged offices, depending on local authority workloads and system complexity. In an NREL pilot of the SolarAPP+ platform, permit review that previously took from under a day to 24 days dropped to under a day, and projects were installed 12 days faster on average.
Step 3: Equipment Procurement
With permits secured, your installer orders the specific equipment for your system. Supply chain considerations have become increasingly important, with some components experiencing extended lead times.
Tariffs and foreign-content rules now affect which equipment is available and what it costs, so ask your installer where the panels and inverters come from. For reference, panel orders tracked by the A1 Solar Index in Q2 2026 were delivered in about 8 days for retail buyers and 9 days for wholesale buyers. Most shipments move by LTL freight, where delivery windows are estimates rather than guarantees. For more background, read why "Made in USA" labels lost buyer trust and how foreign inverters were blacklisted overnight.
Step 4: The Actual Installation Day When Crews Hook Up Your Solar System
After weeks of planning and permitting, the physical installation brings your solar system to life. Residential installations typically complete within a few days for standard systems, though actual duration depends on system size, roof complexity, and weather conditions.
Typical installation day sequence:
- Morning setup: Crew arrival, safety briefing, and equipment staging
- Roof preparation: Measuring, marking, and preparing mounting points
- Panel placement: Lifting and securing panels to mounting system
- Electrical connections: DC and AC wiring according to design
- System testing: Verifying proper operation and safety compliance
Step 5: Inspection and Grid Connection
The final phase involves multiple inspections and utility approvals before your system can legally operate. This process often takes longer than the actual installation.
Post-installation approval process:
- Electrical inspection by local authority (duration varies by location, typically 1-2 weeks)
- Utility interconnection approval (varies by utility provider, generally 2-6 weeks)
- System commissioning and performance verification
The time from installation completion to system activation typically ranges from 2–8 weeks and varies significantly by location and utility provider, with utility interconnection approval often representing the longest delay in the activation process.
Solar Installation Timeline at a Glance
Typical durations for a home solar system. Stages often overlap, for example when equipment is ordered while the permit is pending.
Essential Equipment for Solar Panel Installation

Solar systems consist of sophisticated PV (photovoltaic) equipment engineered to operate reliably for 25+ years. Understanding these components helps you make informed decisions and communicate effectively with installers.
Solar Panels and Mounting Systems
Solar panels convert sunlight into electricity and generate power for your home, but mounting systems ensure they stay securely attached to your roof through decades of weather extremes.
Solar panel types:
- Monocrystalline panels: Higher efficiency, sleek appearance, and now the standard for home systems. Newer cell designs such as TOPCon and HJT push efficiency higher than older PERC cells
- Polycrystalline panels: Moderate efficiency, value pricing, blue coloring, and increasingly rare in new residential projects
- Thin-film panels: Flexible installation, lower efficiency, specialty applications
Typical efficiency and warranty by panel type. Ranges vary by manufacturer and model.
On price, the gap between cell technologies has nearly closed: the A1 Solar Index recorded average transaction prices of $0.355/W for TOPCon and $0.357/W for PERC panels in Q2 2026.
Inverters and Electrical Components
Inverters convert the direct current (DC) electricity from panels into alternating current (AC) electricity used by your home, battery storage systems, and the electrical grid.
Inverter types:
- String inverters: Central unit serving multiple panels, cost-effective
- Power optimizers: Panel-level optimization with central inverter
- Microinverters: Individual inverters per panel, maximum flexibility
- Hybrid inverters: Handle both panels and a battery, and let the system keep powering your home during an outage
Battery Storage
Batteries store the electricity your panels produce so you can use it at night or during a power outage. In 2024, 57% of new residential systems in California were paired with storage, against 8% in all other states combined (Berkeley Lab). Without a battery, most grid-tied systems shut down during an outage.
Solar Installation Costs and Financing Options
Understanding solar installation costs and available financing helps you make informed decisions about system size, equipment choices, and payment methods.
Breaking Down Installation Costs
Solar installation costs vary significantly based on system size, equipment choices, roof complexity, and local market conditions. Installed prices for home systems run from about $2.60 per watt (EnergySage's 2026 national average) to about $4.00 per watt (the median for systems installed in 2024, Berkeley Lab).
Typical cost breakdown:
- Solar panels: about 9–15% of total cost
- Inverters and balance of system equipment: 30-35% of total cost
- Labor and installation: 20-25% of total cost
- Soft costs (permits, inspections, overhead, sales): 30-35% of total cost
Panels are a small part of the bill. The A1 Solar Index recorded an average transaction price of $0.355/W for modules in Q2 2026, against a median listing price of $0.323/W. That is roughly 9–14% of a 2.60–4.00/W installed system.
Estimated total cost before incentives, 2026.
These figures represent costs before applying available incentives. Homeowners who completed a system in 2025 or earlier could claim the 30% federal credit, which saved $7,500 on a $25,000 system. That credit is no longer available for systems completed after December 31, 2025 (IRS), so the sticker price is now much closer to what you pay unless you use a lease, PPA, or prepaid plan.
Prices may also move. In August 2026 the White House announced Section 232 tariffs of 15% on imported cells, wafers, and panels that contain polysilicon, with minimum import prices (for panels, $0.38/W) from December 4, 2026. On top of that, the A1 Solar Index found import duties on Chinese modules above 200% of product value for a fifth straight quarter in Q2 2026. Installers may quote different prices depending on where their components come from.
Financing Your Solar System
Multiple financing options make solar accessible regardless of available cash.
Solar financing options:
- Cash purchase: Maximum savings, immediate ownership
- Solar loans: Ownership benefits with monthly payments
- Solar leases: Lower upfront costs, predictable payments
- Power purchase agreements (PPAs): Pay for power produced
Since the homeowner credit ended, leases, PPAs, and prepaid plans have an edge: the company that owns the system can still claim the federal business credit (Section 48E) and pass part of the savings on to you. This works only within the federal deadlines (construction started by July 4, 2026, or the system placed in service by December 31, 2027), and providers must meet foreign-content rules, so offers differ by company and state. Ask any provider how the credit affects your rate, who owns the system, and what happens if you sell your home.
Financing options—including loans, leases, and power purchase agreements—have made solar achievable for homeowners at every budget level.
Maximizing Your Solar System Performance
Proper installation represents just the beginning of your solar journey. Optimizing system performance and maintaining equipment ensures maximum energy production throughout the system's 25+ year lifetime.
Optimal Placement and Positioning
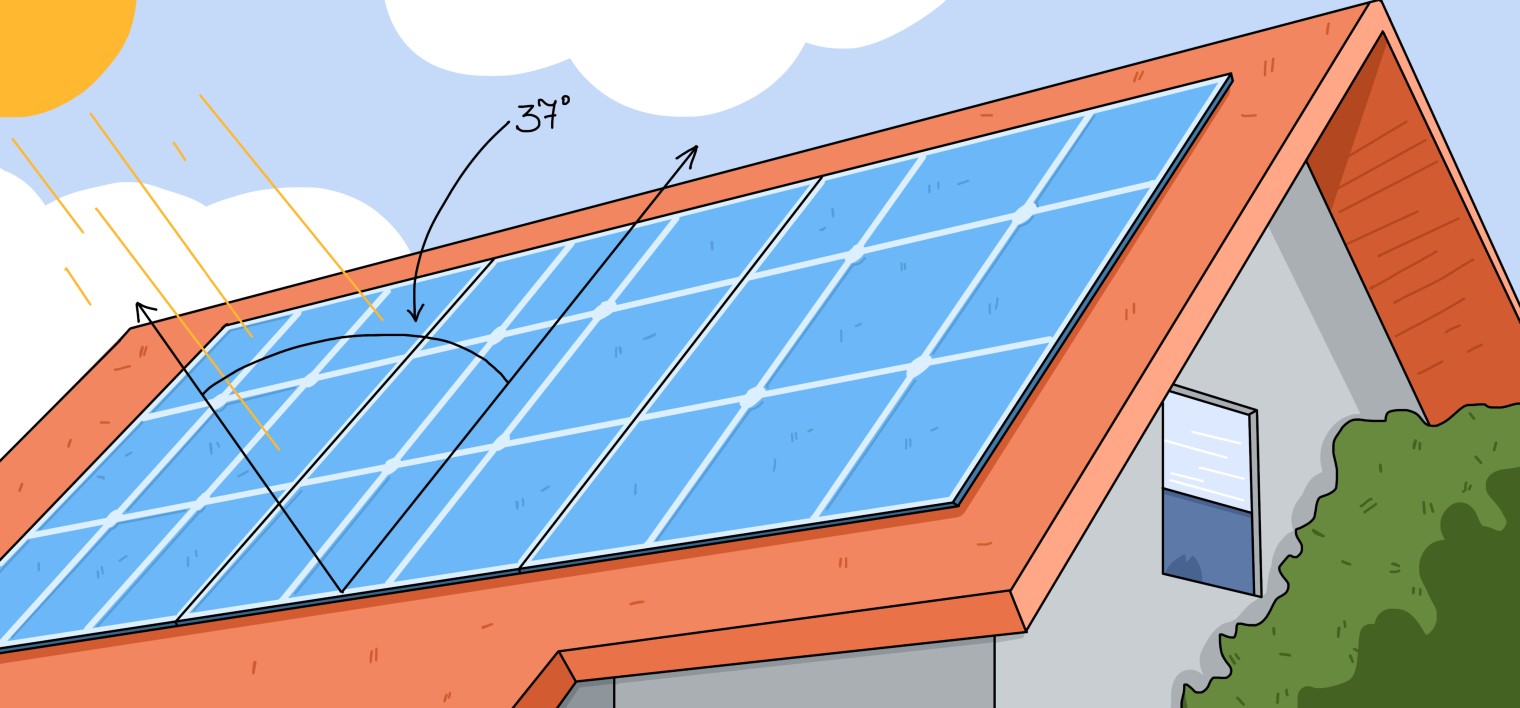
Panel placement significantly impacts energy production, with proper orientation and tilt angles optimizing sun exposure throughout the year.
Key placement considerations:
- Orientation: South-facing panels produce most energy
- Tilt angle: 30-45 degrees typically optimal
- Shading avoidance: Even partial shading dramatically reduces production
Maintenance and Monitoring
While solar systems are largely self-sufficient, regular attention ensures optimal performance.
Routine maintenance tasks:
- Visual inspections for damage or debris
- Performance monitoring through system apps
- Professional checkups every few years or as recommended by your installer
Your solar installation represents a significant investment in your home's energy future. With proper planning, professional installation, and regular monitoring, your solar system will deliver decades of clean energy and meaningful savings on your electricity bills.
Frequently Asked Questions
Sources and Methodology
Data as of October 2026. We review this guide as policy and market data change.
- IRS, FAQs on modifications of sections 25C, 25D, 25E, 30C, 30D, 45L, 45W, and 179D under Public Law 119-21
- SEIA and Wood Mackenzie, Solar Market Insight 2025 Year in Review
- SEIA and Wood Mackenzie, Solar Market Insight Q3 2026
- EIA, Residential electricity bills and consumption, 2024
- Lawrence Berkeley National Laboratory, U.S. Distributed Solar and Storage, 2025 Data Update
- EnergySage, Solar panel cost in 2026
- NREL, Solar permitting, inspection, and interconnection timelines
- Bureau of Labor Statistics, Census of Fatal Occupational Injuries, 2024
- NC Clean Energy Technology Center, The 50 States of Solar, Q2 2026
- Solar Power World, Section 232 polysilicon results: the price of all imported solar panels is going up
- A1 SolarStore, A1 Solar Index, Q2 2026
This guide is for general information and is not tax, legal, or electrical-code advice. Rules differ by state, utility, and jurisdiction, so check local requirements.

Sergey has been running A1 SolarStore since 2017 with the main idea in mind – making going solar easier for everyone. Based on a thorough market research and his personal experience, he shares his ideas on both solar industry and management related topics
More articles from this authorIllustrator: Dasha Vasina


